The “Creation of invoices” option allows the creation and sending of invoices free of charge, as well as their management: modification, viewing and deletion. This option requires identification by the user.
The first thing to do is Create a draft invoice. When we click on the button to create the draft, the tool displays the tabs of the main blocks required to create an invoice:
- General data : we will find the “header” data of any invoice.
- Invoice issuer
- Body receiving the invoice
- Invoice number
- Invoice date
- Others
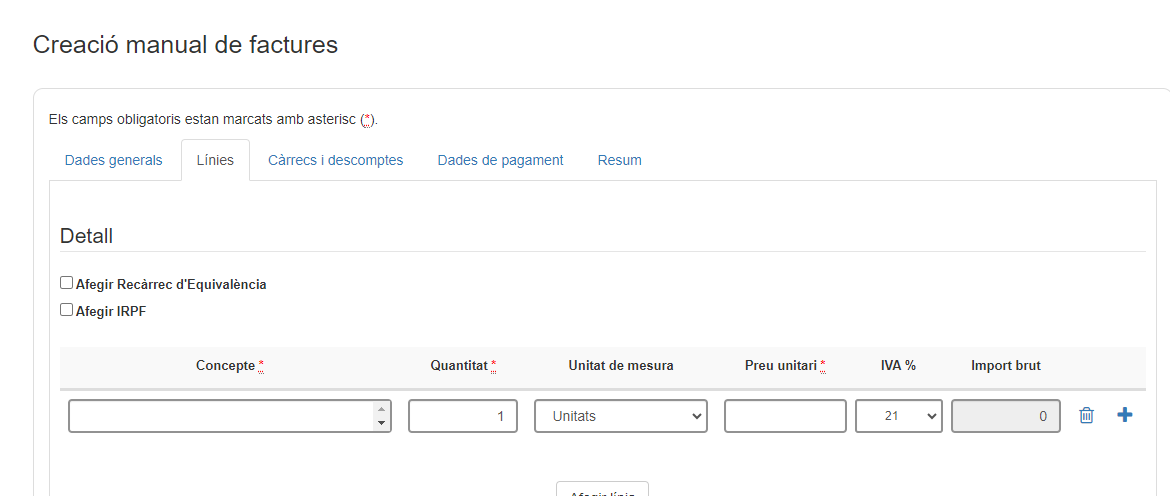
- Lines: This section specifies the details of an item, service, or concept being invoiced. It contains important information such as the product or service description, quantity, unit price, and total for that line. Invoice lines are used to break down the costs or charges associated with each item included on an invoice.
- Charges and discounts:
- Charges: Charges are amounts that are added to the cost of a product or service on an invoice. Charges are typically listed as a positive amount and are added to the invoice subtotal to determine the final total due. They appear in the Invoice Summary.
- Discounts: Discounts, on the other hand, are reductions or deductions applied to the original cost of a product or service on an invoice. Discounts are expressed as a fixed amount. Discounts are subtracted from the invoice subtotal to calculate the final total payable. Appears in the Invoice Summary.
- Payment details : This is the deadline by which payment is expected to be made. More than one payment date (due date) can be defined. The total of all due dates must match the invoice total.
- Summary: This section provides a complete summary of the total invoice calculations. This section is important because it provides a clear overview of the costs and payments related to the business transaction.
It is not allowed to save the draft invoice if all mandatory data has not been completed or if the draft contains errors. If the draft has errors or mandatory data is missing, the fields with errors and the tab will be marked in red so that you can identify it.
Before creating the invoice, we must have registered the issuer of the invoice. Issuers are registered in the “ My Account ” -> “Issue Data” section.
Note : the e-FACT mailbox is for national individuals/legal entities. If you do not have a NIF or CIF, you can use other solutions for creating electronic invoices .
In the issuer drop-down, you will need to choose, from among the issuers we have registered, which is the issuer of the invoice we want to create.
To indicate who will be the recipient of the invoice, simply choose the organization that will receive the invoice in the “ Receiving entity ” field.
By indicating 3 of the letters that identify the entity, a list will be displayed with all those administrations that contain the 3 letters reported.
Once the entity receiving the invoice has been selected, we must select the DIR3 codes, which correspond to the coding system used to identify administrative units and other entities of the public administration. Specifically, we must choose:
- The accounting office
- The managing body
- The processing unit
To choose the DIR3 codes of the administrative unit where we address the invoice, click:
And a new window will open with the list of DIR3 codes that this entity has defined.
Select the row that defines the unit to which the invoice should be addressed, and this row will be the one that will be loaded into the draft invoice:
NOTE: An entity may not have DIR3 codes defined in e-FACT. At the moment, the e-FACT service does not return any errors and accepts an invoice without the entity's DIR3 codes, but they will soon be mandatory.
In the General Data tab, in the “Invoice Data” block, select in the “Document Type” drop-down: Rectifying Invoice.
The “ Invoice data to be rectified ” block will be displayed, which contains the data necessary to rectify an invoice.
In the General Data tab, clicking on “Additional Data” will display the complete block of additional data that an invoice can contain. In this block, we will find the field to enter the order number.
In the General Data tab, clicking on “Additional Data” will display the complete block of additional data that an invoice may contain. In this block, we will find the field to inform the file number to which the invoice is associated.
In the General Data tab, clicking on “Additional Data” will display the complete block of additional data that an invoice may contain. In this block, we will find the field to report legal texts or legal references.
In the General Data tab, clicking on “Additional Data” will display the complete block of additional data that an invoice can contain. In this block, we will find the field to indicate certain general information that you want to transfer to the organization.
Once we have reported the “ General Data ” of the invoice, we must report the details of the concepts to be invoiced. We will need to create as many lines as there are different concepts to be invoiced.
For each line, you must report:
- Concept for what you want to invoice
- Quantity
- Units of measurement
- Unit price
- Taxes that apply to this concept (21%, 10%, 4% or 0%)
- Gross amount, which is obtained from Quantity x Unit Price
- You must include as many details as Concepts correspond to the invoice.
- By clicking on the icon found in each line, additional data can be reported per line: order, file and delivery note:
Yes, each of the details allows you to select the tax rate that corresponds to it.
In the Summary tab we can see the totals classified by tax type:
In the Lines section, you can report both the Personal Income Tax and the Equivalence Surcharge (RE) that corresponds to each line of the invoice.
For each of the invoice lines defined in the “Lines” tab, by clicking on the icon , the data of the line references can be reported, including the delivery note.
For each of the invoice lines defined in the “Lines” tab, by clicking on the icon , the data of the line references can be reported, including the order number.
It is not necessary to include it on the line if it has already been reported in the general data, unless the line has a different order number than what has been reported in the general data.
For each of the invoice lines defined in the “Lines” tab, by clicking on the icon , the data of the line references can be reported, including the file number.
It is not necessary to include it on the line if it has already been reported in the general data, unless the line has a different file number than what has been reported in the general data.
In each of the lines, the final sign of the gross amount is set by the sign of the unit price. For an invoice to have a negative sign, the sum of the gross amounts of the lines must be negative.
To report a charge or discount concept on the invoice, you must go to the “ Charges and discounts ” tab, and add as many charges and/or discounts as necessary to incorporate into the invoice.
To report a charge or discount, you must indicate:
- Description (of the charge or discount)
- Amount (in € of the charge or discount)
Charges and discounts apply to the entire invoice, and are applied to the total net amount. The “Summary” will show the invoice totals including the charges and discounts applied.
Only the following payment methods, available in “Payment details”, can be sent:
If you select “ Transfer ” as the payment method, you will have to complete the IBAN or bank account where the transfer must be made.
In the “Payment details” tab you can add all the due dates agreed with the recipient to make the corresponding payments.
The sum of all due dates must correspond to the total invoice amount.
Once you save the changes and there are no more mandatory fields left, you will be able to view the summary of the draft.
On this screen, in the "Actions" section you can attach documents through the Clip icon.
Browse your device to choose the document you want to attach. Allowed file types are pdf, doc, docx, xls, xlsx, odt, ods, txt, csv, jpg, jpeg.
Once selected, press accept and the document will be attached.
Once you save the changes and there are no more mandatory fields left, you will be able to view the summary of the draft.
To the right of this summary, you will see different actions. To send, you must press the paper airplane icon .